
Maintenance & Technical Guides
Acoustic Architecture: Refactoring the Sonic Identity of Your Hardware
May
In the specialized field of hardware optimization, the tactile experience is only one half of the equation. The other, often more elusive half, is the acoustic profile. A mechanical keyboard is essentially a resonance chamber; every keystroke triggers a series of vibrations that propagate through the PCB, the plate, and the chassis. Without intentional architectural intervention, these vibrations manifest as “hollow” echoes and high-frequency “clackiness” that signify poor structural integrity. This article will elucidate the principles of Case Modding—specifically Foam, Tape, and Gasket modifications—demonstrating how to treat your keyboard as a high-fidelity system to achieve auditory dominance.
1. The Physics of the Hollow Case: Identifying System Noise
To a Solution Architect, a “hollow” sound in a keyboard is the hardware equivalent of inefficient, bloated code. It represents wasted energy. When a switch actuates, the sound waves bounce off the hard, internal plastic walls of the case. If the case has a large internal volume, these waves amplify, creating a “ping” or “echo.”
The objective of acoustic modding is to manage these sound waves through absorption and reflection. By modifying the internal architecture, we aim to filter out high-pitched “noise” and amplify the low-frequency “thock.” This process ensures that the keyboard’s output is a clean, crisp signal that reinforces the immediacy of your typing.
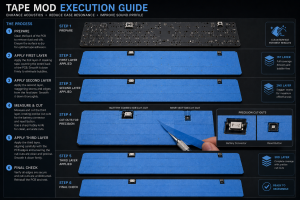
2. The Tape Mod (Tempest Mod): Implementing a Low-Pass Filter
One of the most profound paradigm shifts in the modding ecosystem was the discovery of the Tempest Mod, or Tape Mod. This involves applying layers of masking tape directly to the back of the PCB.
The Logic of Sound Reflection
From a technical perspective, the Tape Mod acts as a “Low-Pass Filter.” The paper and adhesive layers of the tape reflect high-frequency sound waves back toward the switches while allowing lower frequencies to pass through or be absorbed.
Implementation: Typically, 2 to 3 layers of painters’ masking tape are applied.
The Nuance of Material: It is of paramount importance to use non-conductive tape (like paper-based masking tape) to avoid short-circuiting the PCB traces.
This mod transforms a “thin” sounding board into one with a “marbly” or “creamy” acoustic profile. For a developer working on a complex project at FPT Polytechnic Danang, this improved sound provides a satisfying rhythmic feedback that can significantly enhance focus during deep-work sessions.
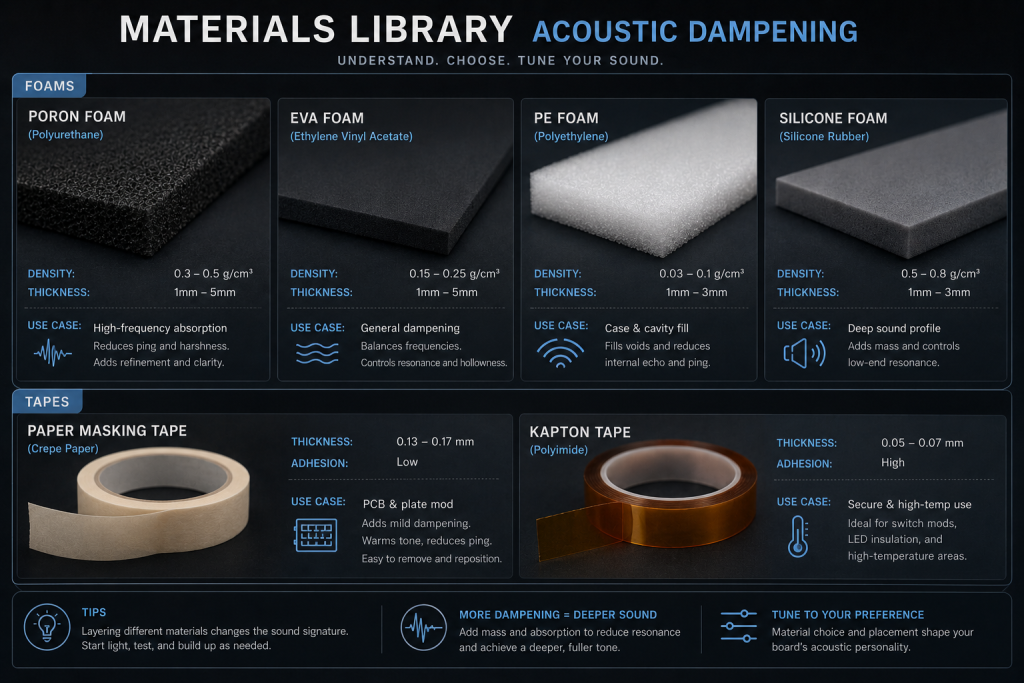
3. Case Foam and Dampening: Managing Density
If the Tape Mod is the “Filter,” then Case Foam is the “Insulation.” The choice of material is an integral part of the system’s final output.
Poron Foam: An open-cell polyurethane foam that is the gold standard for high-end boards. It is highly compressible and excellent at absorbing vibrations without making the board feel “dead.”
EVA Foam: A denser, closed-cell material. It provides a more aggressive dampening effect, which is viable for extremely hollow plastic cases.
Silicone Pour: The most extreme form of dampening. By pouring liquid silicone into the base of the case, you create a custom-fitted, high-density weight. This provides maximum structural integrity and a near-total elimination of case resonance.
As you plan your hardware architecture, you must decide on the desired “Acoustic Density.” Too much foam can choke the sound, destroying the nuance of the switches, while too little will leave the system sounding unrefined.
4. PE Foam Mod: The Pursuit of the “Marbly” Sound
The PE Foam Mod (popularized by the Jelly Epoch keyboard) involves placing a thin sheet of polyethylene foam between the switches and the PCB.
This modification creates a unique acoustic signature—a sharp, “poppy” sound that has taken the community by storm. The PE foam acts as a specialized resonator, emphasizing certain frequencies that simulate the sound of marbles hitting each other. While this mod is highly popular, it does require careful installation to ensure the switch pins can still achieve a reliable electrical connection, preserving the system’s viability.
5. Gasket Mounting: Structural Isolation as a Design Pattern
The ultimate paradigm shift in keyboard architecture is the move toward Gasket Mounting. Traditional boards are “Tray Mounted,” where the PCB/Plate assembly is screwed directly into the case. This creates hard contact points that transmit every vibration directly to the chassis.
Gasket mounting “decouples” the typing assembly from the case using soft strips of Poron or silicone.
Vibration Isolation: The gaskets absorb the impact of every keystroke before it reaches the case.
Flex and Comfort: This mounting style allows the entire PCB to “bounce” slightly, reducing finger fatigue during long coding marathons.
For a future Solution Architect, gasket mounting is the hardware equivalent of “Microservices Architecture”—by isolating individual components, you prevent the failure (or noise) of one part from impacting the performance of the entire system.
6. The Developer’s ROI: Acoustic Environments and Flow State
Why does a student or professional developer care about the “sound” of their keyboard? The answer lies in the psychology of focus.
A noisy, rattling keyboard is a source of “sensory friction.” Every inconsistent click or hollow echo is a micro-distraction. By “refactoring” the acoustic architecture of your board, you create a harmonious environment that supports a “Flow State.” The immediacy of a clean, dampened sound acts as a metronome for your thoughts, allowing you to maintain high levels of productivity whether you are at home or in a shared lab environment.
Furthermore, a well-modded keyboard is a sign of a professional who takes pride in their tools. In the competitive landscape of September 2026, having a setup that demonstrates your attention to detail and technical dominance can be a subtle but powerful part of your professional identity.
7. Benchmarking and Iterative Testing
Just as you would benchmark a new software build, you must benchmark your mods.
Isolation Testing: Mod one component at a time (e.g., just the Tape Mod) and record a sound test.
A/B Comparison: Compare the results to see if the modification improved the system’s viability or if it introduced new issues, such as a “mushy” feel.
This iterative approach is integral to becoming a master of hardware customization. You are not just following a guide; you are “debugging” the physics of your keyboard.
8. Conclusion: The Master Architect of Sound
Acoustic architecture is the final frontier of keyboard customization. It is the process that separates a “generic” device from a bespoke professional instrument. By mastering the nuances of Tape Mods, Foam densities, and Gasket isolation, you establish dominance over your digital environment.
To elucidate the true impact of case modding: it turns a tool into an experience. By ensuring the structural integrity and acoustic clarity of your board, you create a foundation for excellence. As you continue your path toward a “Big Tech” career, let your keyboard be a reminder that even the most complex systems can be refined, optimized, and perfected through the application of logical architecture and disciplined execution.